

A paver patio looks simple from the outside. Flat stones, tight joints, a clean edge. Underneath, though, most of the work is hidden, and that hidden work decides whether the surface stays flat for twenty years or ripples after the first winter.
Good paver installation is mostly about what you can’t see: the depth of the base, how well it’s compacted, and where the water goes. The pavers themselves are the easy part.
This guide walks through the full process for patios, walkways, and similar pedestrian areas. You’ll learn how to choose pavers, plan the site, build the base, lay the surface, finish the joints, and decide whether to do the job yourself or hire it out.
Why Choose Pavers
Pavers are individual units, usually concrete, clay brick, natural stone, or porcelain. They sit on a bed of sand and stone instead of a solid slab.
That design brings real advantages:
Repairs are easy. A stained or sunken paver can be lifted and replaced without breaking up the whole surface.
They flex. Small movement from frost or settling doesn’t crack them the way it can crack poured concrete.
Looks are flexible. Colors, textures,s and laying patterns give you plenty of design options.
Drainage can be better. Water drains through the joints, though the surface still needs a slope.
Upkeep is light. Bob Vila notes that pavers generally need little maintenance and don’t need yearly sanding or staining the way a wood deck does.
The trade-off is labor. Preparing the base takes time, and shortcuts show up later as weeds, wobble,le and puddles.
Types of Pavers
Different materials suit different budgets and climates. Prices below come from HomeAdvisor’s cost guide and cover materials only.
| Type | Typical material cost per square foot (USD) | Strengths | Watch for |
|---|---|---|---|
| Concrete | 8 to 15 | Wide range of shapes and colors, durable | Color can fade over time |
| Brick | 10 to 20 | Classic look, natural color | More porous, may need sealing |
| Interlocking | 3 to 6 | Locks together, good for beginners | Fewer premium styles |
| Natural stone | 15 to 50 | Unique, high-end appearance | Costly, harder to cut and lay |
| Thin brick veneer | 3 to 10 | Low cost, brick look | Not meant for heavy loads |
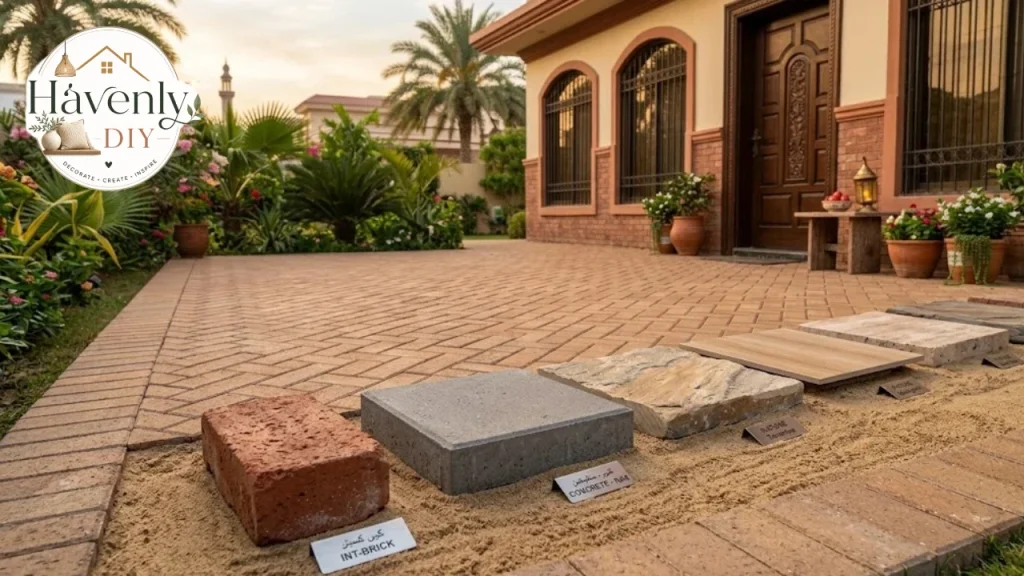
Porcelain pavers have grown popular too. Bob Vila lists their price as widely variable and as materials only, so ask for a written quote that includes cutting and special setting methods.
Matching Pavers to Your Home
Your choice should suit the house as well as the budget. A low, wide ranch-style home often looks best with simple rectangular pavers in earthy tones, while a Spanish-style home pairs naturally with warm terracotta and stone textures.
Look at the roof, siding,ing and trim colors. Pick a paver shade that complements them instead of matching exactly.
Think About the Climate
If your winters freeze, choose pavers rated for freeze and thaw cycles and ask the supplier for details. In hot, sunny regions, lighter colors stay cooler under bare feet.
Planning Before You Dig
Planning is the cheapest part of paver installation, and it prevents the most expensive mistakes.
Pick the Spot and Size
Mark the outline with spray paint or a garden hose. Walk around it and sit in the space with furniture in mind.
A comfortable dining area needs room for chairs to slide back. Leave extra space around grills and fire features.
If you are connecting the patio to a home addition or a new door, plan the finished height of the patio so water drains away from the house.
Check Utilities and Permits
In the United States, call 811 before you dig so utility lines can be marked. This is free, and it prevents dangerous strikes.
Bob Vila says permits are generally not required for a paver patio, but they may be needed if the project involves significant excavation. Rules vary, so check with your local building department and any homeowners association.
Plan Drainage
Water is the enemy of any hardscape. Plan the surface so rain flows away from your foundation.
Polycor’s installation guide gives a minimum slope of 3/16 inch per foot directed away from buildings. An Oklahoma State University facilities guide specifies a minimum 2 percent slope for a pitched pad, which is about a quarter inch per foot.
Both are small slopes you can barely see, yet they keep water from collecting. Use string lines or a laser level to set it.
Know Your Soil
Soil type changes how deep your base should be. Polycor suggests a compacted base of at least 4 inches for pedestrian areas over well-drained soil.
For clayey or silty soil, it recommends 6 to 8 inches of base material, and for sandy or gravelly soil, 4 to 6 inches. Clay holds water and heaves, so it needs more support.
If water pools in your yard after rain, fix drainage before you build.
Tools and Materials
Here is a typical list for a patio project:
- Spray paint, stakes and string
- Shovel, wheelbarrow and rake
- Plate compactor (rentable)
- Level, tape measure and a long straight board
- Screed pipes or rails
- Non-woven geotextile fabric
- Crushed stone base (often called crusher run or dense-graded aggregate)
- Bedding sand
- Pavers and edge restraints
- Masonry saw or angle grinder with a masonry blade
- Rubber mallet
- Broom and polymeric or joint sand
HomeAdvisor estimates base materials at about 1 dollar per square foot, plus rental fees such as roughly 65 dollars a day for a sod cutter and roughly 60 dollars a day for a wet masonry saw. Rental prices vary, so call around.
Wear safety glasses, gloves, hearing protection,n and a dust mask when cutting.
Pavers Installation, Step by Step
Here is the full pavers installation sequence for a patio. Exact specifications vary by product and region, so always follow the paver manufacturer’s instructions and local rules.
The depths below come from two sources: an Oklahoma State University facilities guide and a stone supplier’s installation guide. They differ in places, and I note where.
Mark and Excavate
Outline the area with stakes and string. Then dig out the soil to the right depth.
The Oklahoma State guide says to excavate 5 inches plus the thickness of the paver. Polycor’s guide calls for a minimum 4-inch compacted base, with deeper bases on clay.
Add the base, the 1-inch bedding sand layer, and the paver thickness to find your digging depth. For a typical 2 3/8 inch paver on a 6 inch base, plan to dig roughly 9 1/2 inches. That figure is my own arithmetic, so adjust it for your products.
Dig a little wider than the finished patio, since the base should extend past the edge. Oklahoma State says at least 6 inches beyond the paver edge on all sides.
Set the Slope
Shape the subsoil so it slopes away from the house. Check it with a stringline or laser level, because the base will follow whatever shape the soil gives it.
Remove roots, organic matter,r and soft spots. Fill low spots with base material, not loose soil.
Compact the Subgrade
Run a plate compactor over the exposed soil until it is firm. Oklahoma State lists compacting the subsoil as an early step, though it doesn’t give a numeric standard.
Compacting reveals soft areas that need extra material. Fix them now, because they will settle later.
Lay Geotextile Fabric
Roll out non-woven geotextile fabric over the subgrade. Oklahoma State lists this step before the base goes in.
The fabric separates soil from stone, so the base doesn’t sink into soft ground over time. Overlap the seams and run the fabric up the sides of the excavation.
Build the Base in Layers
Add crushed stone in layers, called lifts, instead of dumping the whole depth at once. Polycor suggests lifts of about 2 to 4 inches.
Compact each lift with a plate compactor rated at 5,000 pounds of force or more, according to Polycor. Slightly damp material compacts better, and you should compact frozen base or place it over frozen ground.
Oklahoma State describes a 4 inch layer of compacted crusher run for its application. Use more for clay or heavier use, as discussed earlier.
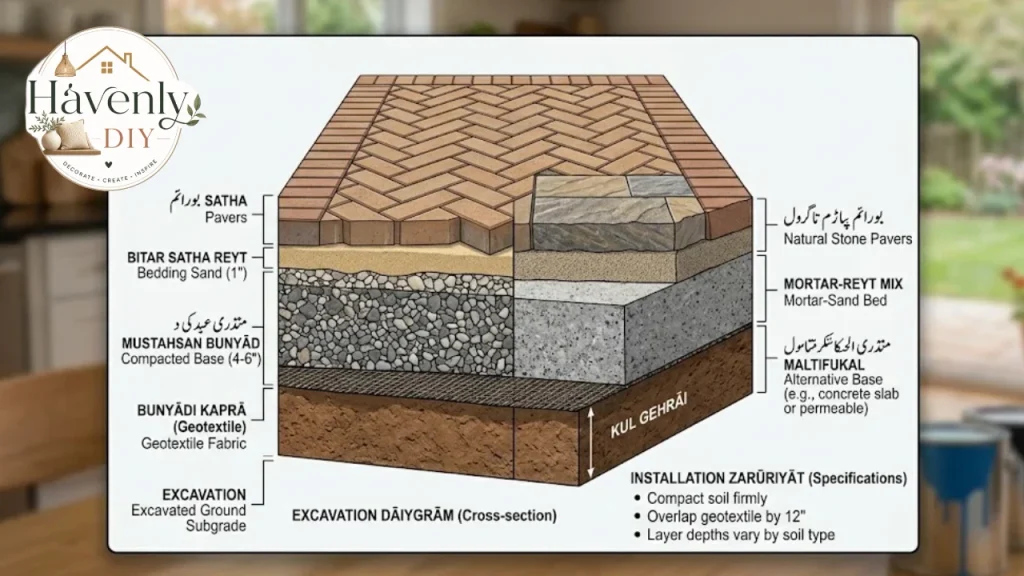
Check the base with a long straight board. Polycor lists a tolerance of plus or minus 3/8 inch over 10 feet, which is a useful target.
Install Edge Restraints
Edge restraints keep pavers from drifting apart over time. Plastic, aluminum, steel, and concrete versions are common.
Timing depends on the type. Plastic and metal restraints usually go in before the sand; three-quarters of the concrete edge is placed after the pavers are laid. It rises about three quarters of the way up the paver side and cures for 24 hours before finishing.
Follow the instructions that come with your product.
Spread and Screed the Bedding Sand
Lay screed pipes or rails on the base, then pour sand between them. Pull a straight board along the rails to level the sand to a depth of 1-inch1 inch, then remove the rails and fill the gaps with sand.
Both guides call for a 1 inch bed. Polycor says not to compact the bedding sand before setting pavers.
Don’t walk on the screeded sand. If you disturb it, smooth the spot again.
Sources disagree on the sand type. Oklahoma State says bedding sand must be masonry sand, while Polycor advises against mason’s sand for its stone products because it can cause a wavy surface. Check your paver manufacturer’s instructions and follow them.
Lay the Pavers
Start at a straight edge or a corner, usually along the house or the longest straight side. Set each paver straight down onto the sand, not slid across it.
Keep joints consistent. Polycor lists a 3/8 inch joint for its pavers, while many concrete pavers have built-in spacers, so follow your product.
Check lines often with a string and adjust before the pattern drifts. Work from the laid surface by kneeling on a board, which spreads your weight.
Cut the Edges
You will need to cut pavers to fit curves and borders. Polycor recommends an angle grinder with a masonry blade or a concrete saw.
Mark the cut, wear eye, ear and lung protection, and work slowly. A wet masonry saw gives cleaner cuts and less dust, and HomeAdvisor lists rental at roughly 60 dollars a day.
Avoid thin slivers. Adjust the pattern or cut two pavers to similar sizes at the border.
Compact the Pavers
Once everything is laid, sweep a thin layer of fine sand over the surface. Run the plate compactor over the pavers, fitted with a protective pad.
Oklahoma State says to tamp from the outside edge toward the middle. This seats the pavers into the sand and levels small differences.
Fill the Joints
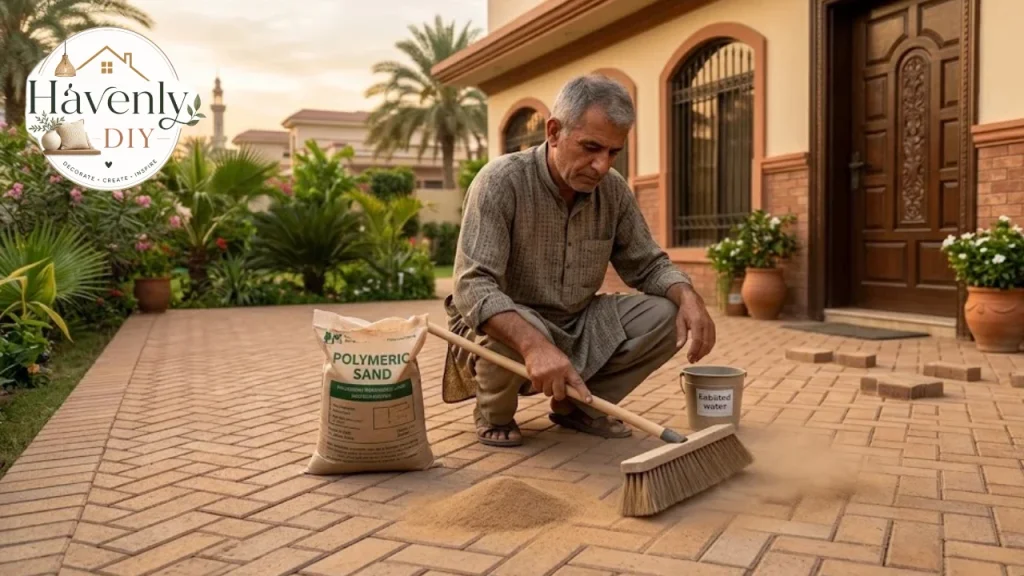
Sweep joint sand into the gaps in all directions, then compact again and sweep more sand until the joints are full. Polycor advises removing the excess.
Polymeric sand hardens when wet and helps resist weeds and washout. Oklahoma State uses polymeric sand in its process. Polycor says it isn’t recommended for some limestone products, so check the manufacturer’s note.
Follow the product label for wetting. Over-wetting can leave a haze on the surface, and rain too soon can wash the sand out.
Backfill and Clean Up
Fill the soil along the edges, grade it so water flows away and seed or sod the strip. Sweep the surface and inspect it for loose or uneven pavers.
Give the surface a few days, then check the joints. Add more sand where needed.
How Long Does It Take?
Time depends on size, pattern,n and experience. Bob Vila estimates that a professional needs 35 to 40 hours for a 300 square foot patio, while a DIYer might need 40 to 50 hours. HomeAdvisor gives a similar DIY figure of about 50 hours on average.
Plan on several days, with a weekend for the base and another for laying pavers. Weather,the deliveries, and cutting all add time.
Choosing a Paver Pattern
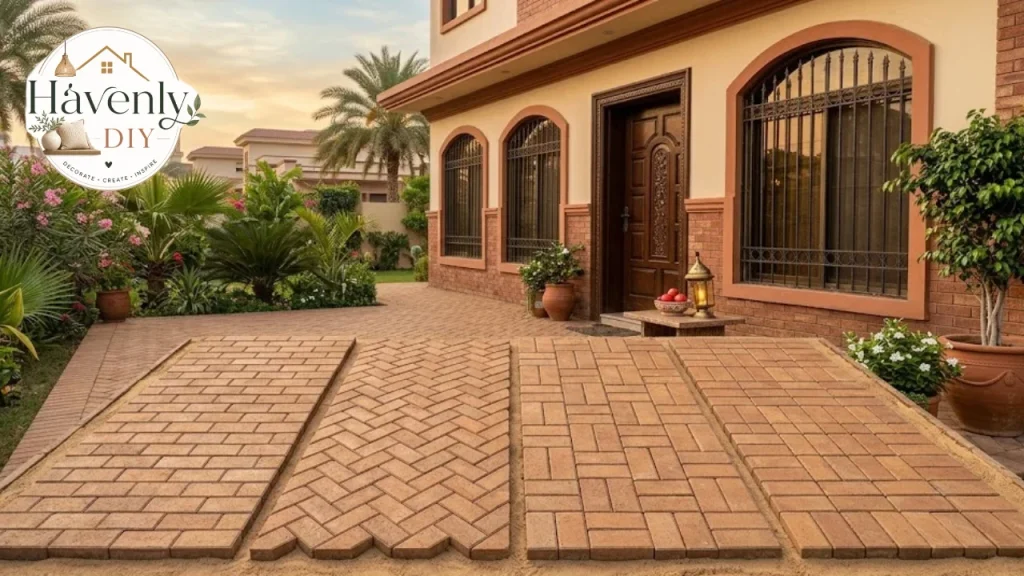
In pavers installation, pattern changes the look, the difficulty and how much you cut.
| Pattern | Look | Difficulty | Waste |
|---|---|---|---|
| Running bond | Staggered rows like brick | Easy | Low |
| Basket weave | Pairs set at right angles | Moderate | Low to moderate |
| Herringbone | Zigzag, strong interlock | Harder | Moderate |
| Stack bond | Straight grid | Easy, but less locked | Low |
| Random | Mixed sizes | Moderate | Varies |
Herringbone is popular for driveways and busy areas because the pieces lock against each other. Running bond and stack bond are friendlier for beginners.
HomeAdvisor lists design complexity, such as herringbone patterns, as a cost factor, so expect higher labor for complex layouts.
Borders and Accents
A border of contrasting pavers frames the patio and hides cut edges. A soldier course, with pavers set on their ends along the perimeter, gives a crisp finish.
Keep accents modest. Too many colors and patterns can look busy.
Sealing and Maintenance
Sealing is optional for some pavers and helpful for others. Bob Vila says to seal the patio before use to guard against weathering and heavy foot traffic, with sealant choice depending on how porous the material is. Brick is more porous than stone, so it needs a product suited to that.
Bob Vila lists sealant at about 200 dollars per 1,000 square feet. Always test a small area and follow the label.
Routine Care
Sweep regularly. Leaves and dirt feed weeds and stain the surface.
Rinse with water. Bob Vila says dirty surfaces can be cleaned by spraying them with water.
Top up joint sand. Refill gaps where sand has washed out.
Remove stains quickly. Oil, rust,t and food stains are easier to clean when fresh.
Reset sunken pavers. Lift the paver, add sand, and tap it back flush.
Winter Care
Use a plastic shovel to avoid chipping edges. Ask your paver supplier which de-icing products are safe, since some salts can damage certain pavers.
Fixing Weeds and Ants
Weeds appear when joint sand erodes; debris collects in the gaps. Sweep, refill the joints,nts and consider polymeric sand to slow regrowth.
Ants can nest under pavers. Fix the cause by keeping joints filled and the area free of food, and follow product labels if you use treatments.
What Does Pavers Installation Cost?
Pavers installation costs vary by region, material, and site conditions. These figures come from HomeAdvisor, whose page is labeled as 2025 data and was last updated June 17, 2026, and from Bob Vila.
| Item | Estimated cost (USD) |
|---|---|
| Average 280 square foot patio | About 3,800, typical range 2,400 to 7,000 |
| Installed cost per square foot | 8 to 25, up to 50 for high-end natural stone |
| Labor only | 4 to 11 per square foot, or 50 to 80 per hour |
| Base materials (sand, gravel) | About 1 per square foot |
| Concrete pavers, installed (Bob Vila) | 6 to 17 per square foot |
| Brick pavers, installed (Bob Vila) | 12 to 20 per square foot |
| Natural stone, installed (Bob Vila) | 15 to 30 per square foot |
Bob Vila says labor is usually about half of the total cost.
Extras That Raise the Price
HomeAdvisor and Bob Vila list several add-ons that can change your total:
- Landscaping or lawn regrading
- Drainage work, such as grading or a French drain
- Electrical, plumbing, or gas lines for lights, outlets, kitchens,s and fire features
- Fire pits, seating walls, pergolas and outdoor kitchens
These figures are published estimates, not quotes. Your local price may differ a lot.
How to Save Without Cutting Corners
Skip the shortcuts on the base. It is the wrong place to economize.
Choose standard sizes and simple patterns. They cut waste and labor.
Do the demolition and cleanup yourself. Some contractors reduce prices for that.
Buy extra material, then return unopened pallets if allowed. Check the supplier’s policy first.
Get at least three written quotes. Compare scope, not just totals.
DIY or Hire a Pro?
Both paths work, and the best one depends on your skills, schedule,le and the site.
DIY Makes Sense When
- The area is flat, sm, and easy to reach
- You can rent a plate compactor and a saw
- You enjoy physical work and have a few free weekends
- The soil drains well, and no retaining walls are needed
Hire a Pro When
- The site is sloped, shady, and wet, or needs retaining walls
- You are building a driveway or heavy-use area
- The project connects to a house, pool, or utility lines
- You want a complex pattern or natural stone
- Your time or health makes heavy labor unrealistic
Questions for Contractors
Ask about the base. How deep, what material,l and how will it be compacted?
Ask about drainage. What slope, and where does the water go?
Ask about warranty. What does it cover and for how long?
Ask for insurance and licenses. Requirements vary by area.
Ask for references and photos. Look at jobs that are a few years old.
Get the scope in writing. It should list materials, pattern, edging, and cleanup.
Common Mistakes to Avoid
Skimping on the base. A thin base is the top cause of sinking and ruts.
Skipping compaction. Loose stone settles, and the surface follows.
Ignoring slope. Flat patios hold water and push it toward the foundation.
Compacting the bedding sand. Polycor advises against it before setting pavers.
Using the wrong sand. Guides disagree, so follow your manufacturer.
Leaving out edge restraints. Pavers spread, and joints open up.
Skipping the utility call. Call 811 before you dig.
Rushing the joint sand. Incomplete joints invite weeds and movement.
Over-wetting polymeric sand. It can leave a hazy film.
Laying in the rain or on frozen ground. Both ruin the base and sand.
FAQs:
How deep should the base be for pavers?
For pedestrian areas over well-drained soil, Polycor suggests at least 4 inches of compacted base. For clayey or silty soil, it recommends 6 to 8 inches. Check your manufacturer’s instructions.
Do I need a permit for a paver patio?
Permits are generally not required, according to Bob Vila, but they may be if the project involves significant excavation. Check with your local building department and any homeowners association.
How thick should the bedding sand be?
Both guides I reviewed call for about 1 inch of bedding sand, screeded level and left uncompacted before the pavers go down.
What is the best sand between pavers?
Polymeric sand is widely used because it hardens and resists weeds and washout. Some natural stone products have exceptions, so follow the manufacturer’s note.
How long does a paver patio take to install?
Bob Vila estimates 35 to 40 hours for a professional on a 300 square foot patio and 40 to 50 hours for a paverer. Weather and cutting can add time.
How much does paver installation cost?
For pavers installation, HomeAdvisor lists an average of about 3,800 dollars for a 280 square foot patio, with a typical range of 2,400 to 7,000 dollars. Local prices differ, so get written quotes.
Do I need to seal pavers?
Not always. Bob Vila says to seal before use to guard against weathering and heavy traffic, with the product chosen for the material’s porosity. Ask your supplier what suits your pavers.
Can I install pavers over existing concrete?
It is possible in some cases, but it needs correct slope, drainage and a stable slab, and the method differs from building on a stone base. Ask your paver manufacturer or a contractor before you start.